
If you are already familiar with Vue CLI, you can just skip reading this post.
Vue JS is an open-source JavaScript framework for building user interfaces and SPA’s (single-page applications).
If you want to build a project in Vue, I’d recommend Vue CLI templates for those who are new to Vue.
Vue-cli offers zero-config rapid prototyping with cli-service, scaffolding, run time dependency and a GUI to create and manage apps.
The Vue CLI component system includes 3 things.
Installing Vue CLI
Let’s install the Vue-CLI and create a new project with the CLI commands.
npm install -g @vue/cli
# OR
yarn global add @vue/cli
Creating a project with Vue CLI
After installing the Vue CLI successfully, we can create a new project using the following command in a new directory
vue create
Or if you are interested in creating the project in an already created folder you can also do that with vue create . command.
After running the above command in a command prompt, cli will be asking us to choose the default preset or we can manually configure our project with the tooling we are interested in.
After selecting a preset either manually or selecting the default, you’ll be asked to select a linter config for the project.
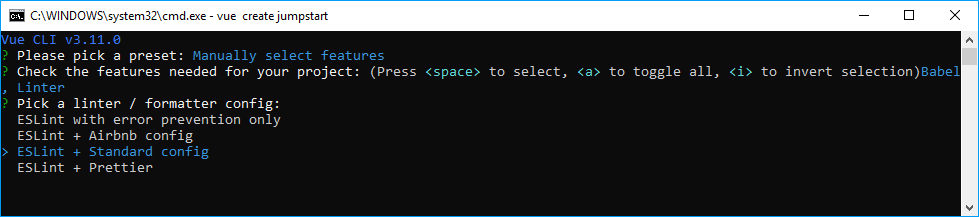
We have 4 different options here.
- ESLint with error prevention only: minimal errors
- ESLint + Airbnb config: ESLint with Airbnb standards
- ESLint + Standard config: Standard config
- ESLint + Prettier: Prettier is a code formatter with rules.
I chose ESLint + Standard config. Once done, the rest of the options you can configure based on your need like lint on save, saving your current config to a preset, etc.
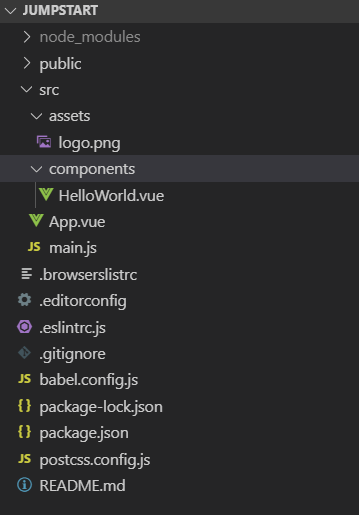
Once done with this you should have your project folder with Vue CLI generated folder structure.
If you are not a command-line person, then you can do it in the Vue UI. All you’ve to do is run the Vue UI from the command line and it launches an app in the browser so you can cherry-pick what configuration you want in the browser.
Exploring the Vue CLI project
Here’s the folder structure.
Let’s see what we have in the package.json file.
{
  "name": "jumpstart",
  "version": "0.1.0",
  "private": true,
  "scripts": {
    "serve": "vue-cli-service serve",
    "build": "vue-cli-service build",
    "lint": "vue-cli-service lint"
  },
  "dependencies": {
    "core-js": "^2.6.5",
    "vue": "^2.6.10"
  },
  "devDependencies": {
    "@vue/cli-plugin-babel": "^3.11.0",
    "@vue/cli-plugin-eslint": "^3.11.0",
    "@vue/cli-service": "^3.11.0",
    "@vue/eslint-config-standard": "^4.0.0",
    "babel-eslint": "^10.0.1",
    "eslint": "^5.16.0",
    "eslint-plugin-vue": "^5.0.0",
    "vue-template-compiler": "^2.6.10"
  }
}
Notice the script section here. We can perform 3 different commands and the vue-cli-service will act accordingly.
We can run the project in development mode using the following command.
npm run serve
# OR
yarn serve
So, if we run the npm run serve command then the vue-cli-service will start the development server for us with Hot Module Reload(HMR) ability.
HMR is the ability to re-compile the code and re-run the dev server when any code changes.
The npm run build compiles and minifies for the production environment.
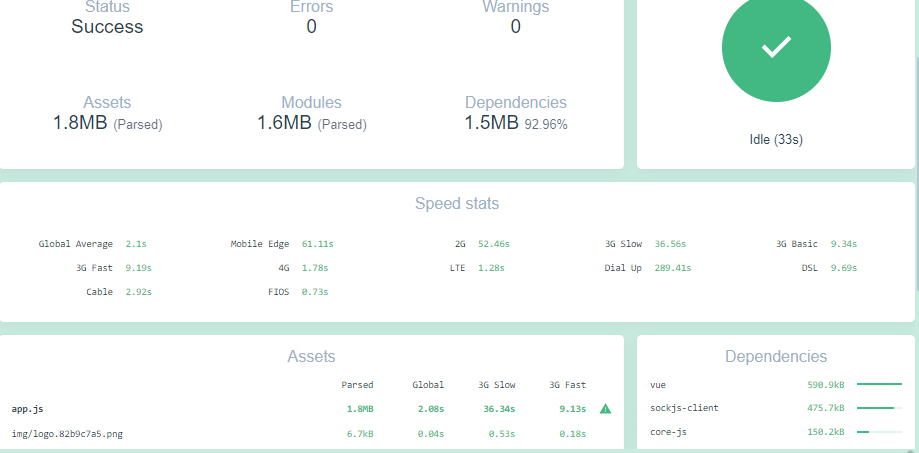
Apart from the command line, you can also build/serve the app from the UI as well with vue ui.

Vue UI provides some stats for our app like speed stats, size of our components, assets, etc.
Vue folder structure
src is a folder that contains all our source code. Inside src folder we will have components and assets folders. You can delete these folders and organize your folders.
I think it is good to have these folders and if you have feature specific components, then you can create some folders under components folder.
Rest of the files in the project folder are configuration files.
Vue app entry point
main.js is the entry point for our app. We define the entry point in vue.config.js file. With the new CLI service, the vue.config.js is optional. So, we cannot see any config.js files in our project but you can have one.
In the main.js, we have the Vue instance for the App component. This will run the App component and App component renders the content it holds.
new Vue({
render: h => h(App)
}).$mount(‘#app’)
App component
The App component is the plugging point for what we need on the home/landing page of our app. You can think of this as a layout for the entire app.
So, if you wish to have a layout like this
<AppHeader>
</AppHeader>
<BodyContent>
   <LeftPanel>
      <!--Holds links to the right panel -->
   </LeftPanel>
   <RightPanel>
      <!-- Displays content -->
    </RightPanel>
</BodyContent>
<AppFooter>
</AppFooter>
Then you need to register the above components(AppHeader, BodyContent, LeftPanel, RightPanel, AppFooter) in the App.Vue file.
If the RightPanel includes a carousel component, then you need not register it here it has to be registered in the RightPanel to render it.
There is no need to register every component you created into the App component.
Karthik is a passionate Full Stack developer working primarily on .NET Core, microservices, distributed systems, VUE and JavaScript. He also loves NBA basketball so you might find some NBA examples in his posts and he owns this blog.


